Homemade polymer clay recipe. Polymer clay. We make material for creativity with our own hands. How to sculpt with polymer clay
A very exciting activity - modeling. You can do everything in the world: flowers, home decorations, toys, jewelry! And if you are working with a child, then it is also very useful! What to sculpt from? Plasticine? Deprecated. Today, modern and more comfortable materials are popular. We will give advice on how to make polymer clay at home.
Polymer clay or cold porcelain?
There is a misconception that polymer clay and cold porcelain are one and the same. The material for art modeling sold in stores is real high-quality polymer clay. It can be of two types:
- self-hardening;
- requiring roasting.
You can cook on your own only a semblance of this material, which is usually called cold porcelain. It will be somewhat different from the purchased one in appearance and other properties, although it has much in common.
How to properly and safely prepare polymer clay at home?
Required Materials
For the output of the finished product in 350 g, you must take:
- a glass (about 250 g) of PVA glue;
- a glass of starch (corn);
- 1 tbsp vaseline (no additives);
- 2 tbsp lemon (lime) juice;
- 1 tbsp cream (without silicone).
Crockery and tools
Everything that will come into contact with the material being manufactured should not be used for cooking afterwards:
- mixing container (refractory, microwaveable);
- spatula (stick);
- substrate for rolling out the mass;
- polyethylene film;
- hygroscopic fabric (cotton, gauze).
Step by step manufacturing
- in a glass bowl, mix starch and glue, add petroleum jelly;
- pour in lemon juice (can be replaced with lime), knead thoroughly;
- place the container in the microwave for 30 seconds. for maximum power;
- take out, mix intensively and again for 30 seconds. in the microwave;
- the cream is evenly applied to the surface of the substrate, where we will lay out the mass;
- take it out of the oven, remove the top crust, pour it onto the substrate;
- for 5-10 minutes, knead the mass with vigorous movements, as if kneading the dough;
- leave in the form of a roll on the fabric to absorb excess moisture;
- wrap in polyethylene and place in a container for storage;
Self-made polymer clay does not require heat treatment, but it is almost transparent in color. In order for the material to play with different shades, use food coloring or acrylic paints. Oil paints are also suitable. Divide the finished mass into parts and stir in the paints gradually. By adding colors little by little.
Advantages and disadvantages
Do-it-yourself polymer clay is an alternative to finding it in stores. You can make a small amount, paint as you wish. The cost of home-made artificial "clay" will be less than the store.
But there are some negative factors of this process:
- everything that is prescribed must be observed exactly, any deviation in the composition of glue, vaseline, lack of paints will lead to shortcomings in the resulting material;
- homemade polymer clay - not intended for outdoor or wet conditions. Without firing, she will be afraid of prolonged (more than 20 minutes) exposure to moisture;
- you need to store it in the refrigerator in an airtight container, otherwise cold porcelain will hopelessly deteriorate;
- it is unlikely that you will have a supply of the right glue, cornstarch or paints at home in advance. And you will also have to assemble the components, having spent time, effort and money.
And therefore, we recommend paying attention to a simpler and win-win option - buying ready-made polymer clay. For example, in the online store Plastilinkin. A little more expensive, but you can't go wrong with the quality, and the time saved on preparation can be spent on creativity.
Recently, DIY crafts are becoming more and more popular. Lepka also applies to this. Unfortunately, not everyone has the opportunity to buy clay for modeling, there are no funds or it is not available in stores. We propose to solve this problem by making clay for modeling with your own hands. Polymer clay is also created by hand in order to avoid high costs when you first start to get acquainted with this material.
Types of clay crafts
So, clay is natural, and sometimes artificial. Polymer clay is a very handy material: it becomes hard only when exposed to high temperatures, and at room temperature it is a very soft material. It is perfect for sculpting dishes and crafts: accessories, decor items, jewelry and many other products. They are made only from clay or combined with other decor items: beads, sequins.


simple recipe
To create clay, we need PVA glue, a glass of cornstarch, a tablespoon of petroleum jelly and silicone-free hand cream, two tbsp. l. lemon juice, bowl, plastic wrap and spatula.
Mix starch, vaseline and glue until smooth. Add lemon juice and mix. We put the resulting mixture in the microwave for thirty seconds, take it out, mix it and put it in the microwave again for the same amount of time.

Smear glue over the area of \u200b\u200bthe working area. We put the resulting mass on top and begin to knead it. Then, we roll the resulting workpiece into a sausage, wrap it in plastic wrap and put it in the refrigerator.


Second way
This recipe is more suitable for sculptural plasticity, as the products are more durable and solid.
To make such clay, we need Art. wood glue, 100 g cornstarch, st. l. stearic acid, glycerin and petroleum jelly, 13 g of citric acid and capacity. It is best to take one where the coating does not burn.

Combine all ingredients except starch. Then, put on a warm fire and stir. Slowly add table starch and mix thoroughly so that there are no lumps. After our mixture begins to peel off from the edges of the sides, spread it on the area of \u200b\u200bthe working area and knead it like dough. Then, let cool and put in the refrigerator, after wrapping with cling film. If you want to paint, you can do it with ordinary acrylic paints.
This way of creating clay is perfect for dishes.
Modeling lesson
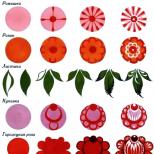
The process of sculpting from homemade polymer clay can be seen on the example of sculpting flowers, namely roses.
For work, we need clay made by ourselves, a clerical knife, pins, foil and toothpicks.
We paint our clay in the desired shade and knead it. We make sausage. Cut the clay into pieces. We press a piece with a finger, creating a rose petal. We make the core by wrapping the first "cake" in a roll. Next, attach each petal. We roll the rose between the fingers, thereby stretching out her tail, as it were. Cut off excess clay with a utility knife.
In the middle, carefully make a hole with a toothpick, without piercing the product completely. This is necessary for sculpting jewelry, such as earrings, in order to then insert the earring itself.

Video on the topic of the article
Watch a video compilation on how to make polymer clay with your own hands and what products you can sculpt from it.
Polymer clay, or, as it is also called, simply plastic, is a material from which many different things can be molded. It is used both in applied arts and in needlework. Day after day, the popularity of polymer clay is increasing, and modeling with this material is becoming more and more interesting.
This material is used for the manufacture of various ornaments, dolls, clothes and even for interior decoration. Many people want to learn how to sculpt with polymer clay, but, unfortunately, not everyone has enough experience in working with this material. But this does not matter, because further we will talk in detail about how to make polymer clay at home and how to work with it correctly.
Composition
Before you start making polymer clay, you need to find out what its composition is. This material is based on polyvinyl chloride, or simply PVC, and also some types of liquid plasticizers are present in the composition - thanks to these liquid substances, the plastic becomes more plastic and softer. PVC is often compared to gelatin: its particles, like gelatin, absorb water - this is the main property of plastic. In addition to the listed substances, the composition also contains some pigments that change the color of the plastic to a brighter, juicier one.
To give the plastic the effect of mother-of-pearl or metal, mica is added to it. In addition, kaolin, chalk, talc are added to clay as a filler and modifier. And also, stabilizers must be present in the composition of polymer clay, due to which the clay does not turn into jelly ahead of time during storage at normal temperature. If the temperature in the place where polymer clay is stored is sixty degrees, then the material will begin to harden (stabilizers stop this process).
After we talked about what this material consists of, time to start making it.. The plastic itself is not cheap. And it’s much easier and cheaper to cook it yourself from improvised means. And then the decorations created with your own hands from homemade clay will come out almost free. Homemade clay and the one sold in the store are completely different from each other, or rather, they differ in composition. But homemade plastic is just as good as the real thing.
Ingredients for making polymer clay
And now the question arises: "How to make polymer clay with your own hands?". To start stock up on the following ingredients:
- two tablespoons of lemon juice;
- pva glue (two hundred and fifty grams);
- cream or petroleum jelly that does not contain fat and silicone;
- Corn starch (two hundred and fifty grams).
In addition, you will need plastic spatula, bowl (you need to stir somewhere: D), plastic wrap (a piece), a spoon to stir, a substrate.
From all of the above, a white mass should be obtained, which will come out about three hundred and fifty grams.
Manufacturing process: recipe

 In order to better understand the manufacturing process, it is recommended to watch videos, of which there are a lot on the Internet.
If you want to add a little fun to modeling, that is, flowers, then for this use various dyes (food), oil paints or for fabric. But it must be remembered that it is impossible to put all the paint at once, it is put little by little.
Often, beginners find the clay to be stiff and less flexible. And the question arises: "What to do?". In this case, do not be upset, because the plastic is easy to make soft again. To do this, it is necessary to warm it up and stir it with petroleum jelly.
Modeling is a fascinating activity that is useful and interesting for both children and adults. Clay crafts are made by both professionals and amateurs. And for kids, modeling is simply necessary for the development of fine motor skills, which is closely related to the development of speech and intelligence. Clay for modeling is easy to prepare with your own hands, following our recommendations.
How to knead natural clay for modeling with your own hands
Dry clay for crafts can be obtained naturally or bought in the store in powder form. If you have a clean store-bought powder, you can immediately start kneading the clay dough. If the clay is street, it needs to be prepared:
- Crush the lumps of clay and pour into a container with water, a layer of water of 15 - 20 cm should remain on top and leave for a day. Then mix the liquid mixture and strain through a fine sieve. Leave the mixture for another 2-3 days, then drain excess water from above (or pump it out).
- Then the mass is poured into a canvas bag and hung to remove excess moisture. The process may take a long time. To speed up the clay mass, you can put oppression to get a filter press. The finished mixture should stand in the air for a while.
- You can store the mass in boxes, after wrapping the dough with wet rags.
- It is very important to determine the fat content of clay when choosing a material in vivo. If the clay is good, when it is moistened and pressed with a finger, a shiny mark remains, and if you mold a flagellum and roll it into a steering wheel, it will not burst and there will be no large cracks. Such clay is suitable for sculpting dishes and large items.

- Prepare a place to work, dry clay, water and a container, a board for kneading the dough. It is desirable that it be at a level just below the waist during work.
- Knead the clay like a dough, gradually adding water to the powder. It will be more comfortable to work with warm water. Clay should be plastic, but should not stick to hands.
- Another way of kneading is to pour 2/3 of dry clay with water and wait until it is completely absorbed. After the dough has rested a little, you can add the remaining gin in the form of a powder, and start revenge with your hands.
- The finished dough of a suitable consistency must be beaten off. This can be done by carefully kneading the mass on the board, rolling a ball and vigorously throwing it onto the board, or using a mallet.
- Sculptural clay is ready. Now you can start sculpting. And if it is planned to sculpt later, the mass must be wrapped in a damp cloth and on top in a plastic bag. Store the finished clay in the cold.
What is polymer clay and how to make it yourself?
Polymer clay is a man-made material that hardens at high temperatures. This clay is great for children's creativity, for sculpting a variety of small crafts and flowers. You can buy it in stores, but not everyone can afford it, and it is difficult to find it in small towns. A great alternative is to make such clay with your own hands.
Recipes for making polymer clay:
- PVA glue (preferably carpentry) about? glass.
- 200 g cornstarch.
- Mineral or baby oil (just over 40 ml).
- A tablespoon of lemon juice (15 ml).
- Wooden spoon, rubber gloves, container (preferably no longer needed) or with a non-stick coating.
Mix starch with glue, add oil and lemon juice (can be replaced with a small amount of citric acid). Put the container on low heat and stir until a mass similar to mashed potatoes is formed.
Then remove from heat and add some more oil. We spread the mass on the prepared surface, knead it like dough. Then wrap with cling film. After cooling, store in the refrigerator. Clay products according to this recipe will slightly decrease when dried, and dry for about a day.

How to make polymer clay from potato starch?
Potato starch is more common than corn starch, so a recipe with it will come in handy for many.

- 100 g starch
- 100g PVA glue
- A teaspoon of hand cream or Vaseline
- 2 teaspoons baby oil
- Water bath containers
We mix all the necessary ingredients and put the container in a water bath. Immediately begin to stir vigorously. As soon as lumps appear, remove the mass from the stove. Immediately spread the mass on the surface and continue to knead with your hands.
We check the readiness of the clay by rolling a small ball. The ball should be smooth and without wrinkles. We wrap the mass in a film and leave to ripen for 12 hours.
Most of all, the quality of homemade clay is affected by glue, so lumps and expired shelf life are not allowed.
Polymer clay is often used to sculpt jewelry, such as:

Dyes can be added to clay and ready-made products can be painted.
Video on the topic of the article
For everyone who wants to take a closer look at the process of making clay for modeling, we have prepared a selection of video master classes:
Polymer clay or thermoplastic is a great material for creativity. From it you can make unusual jewelry, food for dolls and decorative figurines. The cost of plastics is high, especially if you need to make a large figure. To save money, you can make polymer clay yourself.
To prepare thermoplastic, take a large bottle of PVA glue. A 250 ml jar is enough. Pour the glue into the cornstarch bowl. A glass of cornmeal is enough. After that, in a viscous mass, add a tablespoon of petroleum jelly and hand cream. Pour in 2 tablespoons of lemon juice. Mix everything thoroughly and place in the microwave for 30 seconds. Remove the mass from the oven and remove the hard crust from its surface. Knead the elastic mass thoroughly and put it back in the microwave for 30 seconds. After that, cool the plastic to room temperature and mix for 5 minutes. It is better to knead on a table with a silicone mat. It is desirable to lubricate it with glycerin or hand cream. Clay should become elastic and soft. You will get 300-400 g of material. This amount is enough to sculpt a medium-sized figurine. What to do if the mass crumbles and rolls poorly? In this case, heat the thermoplastic in the microwave and add a spoonful of petroleum jelly or glycerin to it. Stir until smooth. Remember, polymer clay should not be stored outdoors, it will dry out. Wrap each piece of material with cling film and put in a jar. Close the container with a lid. If necessary, take from the jar only the amount that you need. Keep leftovers refrigerated. The shelf life of homemade mass is 6 months. Don't forget to wrap the pieces in cellophane. It will prevent the clay from drying out.


With a little work, you will get a piece of thermoplastic that will allow you to create jewelry, figurines and even dishes.