Decorative drawing based on Gorodets painting coloring book. Stencils and patterns for Gorodets painting. Elements and technique of their execution in Gorodets painting
Gorodets painting is a traditional Russian art that has its own characteristics and is very interesting for children. From the history of this type of painting, it is known that ordinary peasants used to do it, which gave a characteristic mixture of noble and simple-minded style.
The drawings were depicted mainly on a wooden base and were decorations for houses and household items. Today, Gorodets painting is adapted for children and adults, it can be depicted on a simple sheet of paper.
The colors that are used for this craft are very bright and cheerful. Gorodets painting and each of its elements is a symbol. So, the image of a horse with a lush mane and a long neck means wealth, firebirds - happiness, and bright flower buds - success in any endeavor. Therefore, each drawing carries its own symbolic meaning.
If we talk about the complexity of the technique, then it largely depends on the elements that will be present in the pattern. If you understand the secret of technology, then the drawing will turn out easily and quickly.
From this article you will learn
What to buy for lessons
The modern approach makes it possible today to apply the technology of using Gorodets painting not only on wood, as it was originally, but also on an ordinary sheet of paper. In the school curriculum, children are introduced to the methods of depicting animals and patterns of Gorodets masters.
To conduct lessons for children, you need to purchase such necessary supplies.
- The material on which the drawing will be displayed. For children who are just starting to take their first steps in Gorodets painting, plain paper or cardboard (not glossy) would be ideal.
For those who have already acquired the skills of the image technique, you can use wooden blanks for work. These can be cutting boards, plates, etc.
- Dye. Her choice also largely depends on how much children are engaged in this skill. If beginners, then gouache paints will do. The most common sets of 12 can be used.
- Tassels. They need to be selected in different sizes. It is better if these are brushes made of natural pile.
- Varnish. If you draw on a wooden surface, then after drying, the drawing must be fixed with a transparent varnish. It will protect the drawing from damage and prevent the colors from fading.
Image start
In order for the drawing to turn out really neat and beautiful the first time, it’s not enough to just desire and prepared materials. It is very important to learn the technique of applying the image. Here you need to understand how to hold the brush, how to lead, what movements to use to depict the details of the picture.
All Gorodets painting is done in three stages. The first thing to do is apply a background on which the drawing will be superimposed. Next, we perform the drawing in stages.
- Underpainting. Large color spots, which will subsequently serve as the basis for the image. These are big figures. For children, underpainting elements are very easy to come by.
They are applied in a thin layer, completely shaded. You need to sketch them very carefully so that there are no divorces, influxes or gaps. For a good result, it is better to paint with a flat, wide brush.
- Tkanevka. Brush number 2 is used. The essence of this stage is breaking the underpainting into parts and highlighting details.
- Animations. This is another technique in the Gorodets technique. Here, black and white paint comes to the rescue, with which the accents of the picture are highlighted. This stage is very difficult and requires concentration.
A lot of dots are applied to the underpainting and fabric with black and white paint, which give brightness and liveliness to the picture. It is important not to overdo it here, as a large amount of animation can ruin the drawing.

Gorodets painting will turn out very well if you learn how to hold the brush correctly. It should be perpendicular to the surface on which the pattern is applied.
In this case, the arm should be supported on the elbow and fixed by it, while the hand remains mobile and free. If it is difficult for a child to hold a hand in this position for a long time, then you can make support on the little finger. In this position, the hand is easier to draw smooth and regular lines.
The last thing in drawing Gorodets painting is to connect all the elements together in stages. Pictures should be bright and colorful.
This is the main feature of this trend in art. If the child has learned to draw elements well on paper, you can continue and offer to draw on a wooden base.
Composition features
Gorodets painting has its own characteristics in the placement of the main elements. To make the drawing organic, you need to think it over very well and make a sketch. Only then are the elements transferred to the base. For children, it is necessary to explain the basic compositional techniques of Gorodets painting.
In the center of the picture, one large element is necessarily performed. It can be one of the images:
- plant motif (flower);
- image of an animal (horse, bird).
Smaller pictures of flowers and leaves act as additional elements in the composition of the Gorodets painting. The composition ends with the design of the frame. She is also one of the decorations of the entire compositional range.

Gorodets painting requires the student to complete all the details in stages. He must understand that it will not be possible to quickly make such a drawing, since each of the stages is applied after the previous one has completely dried. Concentration and the desire to achieve a positive result - this is the main rule of an ideal drawing.
Emma Zhavnovskaya
When we first met, we got to know each other a little. gorodets painting. Found out that this painting not only unusually beautiful, but also symbolic. Today we will study draw a fabulous bird. Here's one.
1 For this we need a plank or tinted paper, brushes of different sizes and paints.

2Determine the composition of the picture, the place where the flowers will be located and bird. We draw flowers.

3 Light lines draw the outline of the back, breast and tail birds. Don't forget to keep the brush perpendicular to the drawing!

4 Paint over the body and tail. With a thin tip of the brush, draw the beak and legs.

5 Paws and claws are depicted with light lines in the form of arcs and dots

6 We draw a wing and a tuft.

7 With blue strokes we depict feathers on the tail and on the head.

8 "Reviving" our bird with white and black paint. We paint the body and wing.

9 We decorate the edges of our plank with a border. That's all! As you can see, there is nothing super complicated here. Yes, and do not forget to cover your beauty with varnish.

Good luck everyone!

How to draw a Gorodets pattern on a plate in stages for children from 7 years old
Bogatova Oksana Nikolaevna, teacher of MKDOU "Kindergarten No. 94" Dzerzhinsk, Nizhny Novgorod region.Description: the master class will be of interest to educators, primary school teachers, teachers of additional education, and parents. Children 6-7 years old will be able to do the work with the help of adults, and older children - on their own.
Purpose: a panel-plate can serve as a gift to relatives, friends, as well as decorate the interior in the kitchen.
Target: creation of a decorative panel with Gorodets painting.
Tasks:
- continue to acquaint children with folk crafts;
- learn to make a pattern from the elements of Gorodets painting;
- improve drawing skills with a thin brush;
- develop a sense of composition;
- to cultivate interest and respect for folk art.
Before starting the master class, I suggest for a moment to remember the history of Gorodets painting, to feel its sunny, kind atmosphere.
Gorodets painting on wood- the famous folk craft of the Nizhny Novgorod region. It was developed in the second half of the 19th century in the Volga villages near the city of Gorodets. The inhabitants of the surrounding villages were known as skilled craftsmen, among whom were blacksmiths, weavers, dyers, carvers, carpenters and joiners. There were many forests in the Trans-Volga region, and it provided a lot of cheap material from which everything was made: from children's toys to furniture.

Gorodets spinning wheels were especially famous, which were sold in large quantities at the Nizhny Novgorod fair and dispersed throughout Russia. They were bought with pleasure thanks to funny painted pictures on the bottom of the spinning wheel. After finishing work with such donets, the hostesses decorated the walls instead of paintings.

Soon, such painting began to decorate not only spinning wheels, but also many household items: chairs, baskets, boxes, salt shakers and toys.
Gorodets painting is peculiar in its manner, so it is quite difficult to confuse it. Not a single Gorodets product is complete without lush garlands, bouquets of flowers resembling roses and daisies.


The plots of Gorodets products had a peculiar and unique plot. Masters depicted walks of gentlemen with ladies, riders on horseback, scenes of tea drinking in rich interiors.

Previously, Gorodets painting was done with egg paints, which lay on the product in large color spots, without a preliminary outline.
The drawing was applied in free strokes with a graphic stroke in black or white. Blue, red, white and black colors prevailed.
Today, craftsmen use oil paint, which has expanded the range of colors.
But the motives and technology of Gorodets painting remained the same.
Modern artists, as before, paint all kinds of wooden products: caskets, caskets, decorative panels, cabinets, shelves, bread bins, salt shakers, toys and furniture.


It has become a tradition for Nizhny Novgorod schoolchildren to visit Gorodets with excursions.

There they learn a lot of interesting things from the history of the Nizhny Novgorod region. They plunge into the atmosphere of the life of their ancestors. They can touch everything with their hands.


And, of course, they participate in master classes of local masters.


Children are delighted with such trips.

And now let me introduce my master class on drawing Gorodets painting.
Materials: paper plate, acrylic white primer, primer brush, drawing brushes No. 1, No. 2, No. 5, gouache (yellow, ruby, white), watercolors, simple pencil.

We cover the plate with primer (acrylic dries quickly).

Let's depict one of the elements - a camomile - in the center of the plate. In Gorodets painting, a camomile can be blue, purple, red, and orange (a multi-petal fantastic flower). We draw a drawing with a simple pencil.


Stage "underpainting". We make the background with yellow gouache (brush number 5).

We mix ruby and white gouache, we get a pink color. Making a pink background

Outline the flower with red watercolor and paint over the circle in the center (brush number 2).

Inside the red petals we make the second row, then draw the petals around the center with white watercolor.

Outline with white the large petals inside and the small ones outside (brush number 2), add three strokes (white and red), apply dots (brush number 1).

Now, draw the leaves with mustard color. The leaves in the Gorodets painting vary in size, but are always arranged in groups. At the same time, they never exceed the size of the central flower of the composition.

We draw green leaves.

We make veins on the leaves (brush number 1) - draw a line along the leaflet and a few short ones across.

Veins on green leaves are done differently.

Stage "revival". We emphasize mustard-colored leaves on all sides with a thin line (brush No. 1) with black paint, and green ones - on one side - with antennae.

Our plate is ready.

In the center of the plate, you can depict other variants of Gorodets flowers, for example, roses.
Copying is an obligatory moment in the study of painting. For some, it becomes only a stage, while others stop there.
We will need:
1 Squirrel or kolinsky brushes No. 1 - for contour work and No. 2 - for painting.
2 Artistic gouache (can be replaced with acrylic or tempera paint), + a jar of water.
3 A thick sheet of paper or a product that you want to paint (previously sanded)
4 Pencil, eraser, ruler.
5 Templates cut out of cardboard - circles of different diameters. I have - 5.5 cm - large; 4 cm - medium; 2 cm - small.
What are templates for? All flowers in the Gorodets painting are based on circles. In order not to mess with the compass, it is easier to circle the templates.
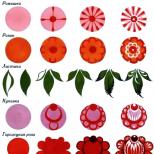
Elements of the Gorodets painting of today's lesson:
Rosan, otherwise kupavka - the largest flower;
Bud - a small rose, a smaller rose;
The sun - a socket - is smaller than a bathing suit;
Berries, apples are the smallest elements of the Gorodetsky bouquet.
In addition to flowers in Gorodets, there may be birds and horses, as well as plot scenes in the interior and in nature.
A flower arrangement is built according to one simple principle - from a large flower to a smaller one. The smallest element closes the flower garland.
Draw flowers as in the next example, and then start drawing leaves 2-3 pieces between the flowers (in general, as much as you like). The leaves are shaped like boats (two arcs are turned towards each other, look at the brackets on the keyboard). Or you can do it differently - on the one hand, an arc, on the other, a slightly wavy line (a kind of tubercle - rocker)

Fill with leaves all the gaps between the flowers, where there is not enough space, you can also 1 leaf. At the ends of the flower branches, you can draw 3-5 leaves, as if with a bush.

In the center of the composition we will draw a bird or a horse. I will show you how to draw a bird. We begin to draw the line of the abdomen, but not in the center of the sheet, but slightly to the left.
a) First, draw a tummy, in fact just a wavy line. (the upper curve is smaller - this will be the neck and beak, and the lower curve is large - this is the tummy)

b) Now we draw a wing. It is located in the abdomen. The shape resembles a large drop lying on its side. The wing just falls in the middle of the leaf, that is, a large rose flower looks just at it.
Draw the head and back. Another wavy line. A tubercle in the region of the head, and further down, almost straight down to the wing.


c) legs. Under the belly, draw 2 lines about 1.5-2 cm long. Direct one towards the tail, the other almost straight. It is necessary to finish the thighs - this is again 2 lines - arcs.

The bird is ready and the whole composition as a whole is ready for painting.
A few tips:
Change the water in the jar more often. I change with every color change.
Do not leave the brush in a jar of water, the pile breaks, the handle comes off.
Do not use a good brush for mixing paints, use old low-quality glue brushes for this purpose.
Properties of gouache: when dried, it brightens 4 times, stains hands, and dries quickly. Therefore, do not leave jars of gouache open for a long time.
Don't be afraid to turn your work surface (album sheet is also one) so that it is always convenient.
The first stage is called “painting” and essentially resembles coloring. Now let's do this coloring. You can choose the colors yourself, or you can repeat mine. Basically, these are blue, red, or raspberry or burgundy whitened with white .. As a result, pink, blue. And orange and green in its pure form (without whitening). See below the process of painting on pictures without comments.


The second stage is called "shading". We paint over the cores (circles at the top of the flower) and shade the arches on the flowers with the color from which they were whitened (blue, raspberry). And on orange berries - a red or burgundy tint. Also the bird's tail.


The third stage is called "spreading". Let's start with black. We revitalize the leaves - we circle the side that I called the “arc” in black (only on one side), inside each leaf there are a pair of antennae of different lengths.
On the other side of the leaf, draw droplets or lines (from a large drop at the top to a small one at the bottom), the droplets are parallel and close to each other,
Let's add black feathers to the bird's tail and a couple of strokes on the paws.
Draw a bracket in the middle of a large rose in crimson color, and 2-3 drops of different lengths along the edges of it, repeating the shape of a circle. On the longest, put antennae curled towards the center of the flower.

Now let's liven it up with white color - draw "horseshoes" on the shading of the rose and buds,

Draw a dash on the cores.

Circle the petals of the rose from the inside, as well as the apples (orange) from the inside and put a tendril in the middle, and put a few drops on it; and circle the bracket in the center of the rose and make hatching, it is called the “beard” (everything is white). Put the droplets in the middle of the buds and roses and between the horseshoes.

Liven up the bird to your taste or, as I do, with the same methods - “horseshoes”, “antennae”, “droplets”, “pokes”.
The fourth stage is "revival". With a white match, put pokes on the leaves (right on the antennae), as well as on the cores, between the horseshoes, the eye of the bird, on the wing, at the ends of the white antennae (at the apples). You can also on the tail of a bird (I did not draw).
Put a few red drops on the bird's wing, and paint the frame red. It remains to draw with the help of drops (black) the stem between the flowers so that the flowers do not hang in the air and fill the empty space with tendrils emerging from the leaves. String parallel droplets or pokes on them (from largest to smallest)
Everything is ready!

Flowers are a symbol of health
Flowers are an indispensable part of any Gorodets work.
For a good mastery of Gorodets painting, it is enough to be able to draw only four flowers. Let's learn how to draw these four flowers. They are drawn in three stages: underpainting; pointing petals; animations.
Prepare paper, pencil, one art brush and so far only one paint from the gouache set - kraplak. Draw four circles in a row on a piece of paper with a pencil: the first one is smaller, the rest are the same (see pic.).
Using a brush and cherry paint (kraplak), draw a round colored spot in each of these circles; on the first two - on the side, and on the other two - in the middle. For convenience, in the future we will call this speck a nose. Now let's finish these four flowers with the same paint (kraplak).
On the first circle draw an arc. To do this, holding the brush in the fingers vertically (perpendicular to the sheet of paper), we begin to direct the arc at first only lightly touching the paper with the tip of the brush, then we press hard on the brush (the brush leaves a wide smooth mark) and complete the arc again with a thin line. It turns out a beautiful arc in the form of a young month (Fig. a).
On the second circle draw the same arc, but now not along the edge, but inside the circle. And along its edge - rounded petals in shape are exactly the same as the arc, only smaller. The flower turned out to be somewhat reminiscent of a rose (Fig. b).
On the third round draw the petals along the edge of the circle (fig. c).
On the fourth round draw the droplets using the priming method. They are located along the radius around the spout drawn in the center (Fig. d).
Now compare your flowers with those in the picture ... Make sure that all the arcs are rounded and convex, like wind-blown sails, so that the noses of the third and fourth flowers are large enough (no less than 1/3 of the diameter of the circle in which they are placed).
Terminology
- bud (Fig. a);
- the Rose (Fig. b);
- rosean (fig. c);
- chamomile (Fig. d).
In other sources, these same flowers may be named differently!
Color
Let's talk about what color the flowers that we learned to draw will be.
For now, we will draw all the flowers only in pink and blue. There are many pink flowers in the painting, but few blue ones. There may be no more than one quarter of the total number of flowers, or even fewer, or even not at all in the Gorodets painting.
Gorodets flowers are always drawn on colored circles. When they begin to paint the work, at first they draw only colored circles (this is the underpainting). Why so? Such is the tradition. It is enough to be able to depict only four flowers, which are described here, and the impression of a huge number of these flowers is created only thanks to their color - red, pink, blue, blue, ocher, brown, cherry and even black. There are no flowers only orange, yellow and purple.
Again, draw the same four circles from which we began to learn how to depict Gorodets flowers. Any of the four circles will be painted with blue white, and the remaining three with pink white. Now on these underpaintings we will draw the same flowers as in the picture.

Pay attention to the fact that on the blue circle we point the petals and the nose of the flower with cobalt blue, and paint the pink underpaintings with red paint.
revives
Now let's move on to the third stage: it remains to do on the flowers animations. The animations on the flowers are made with white paint using an N2 and N3 art brush.
The tip of the brush is carefully dipped in white gouache and the flowers are decorated with dots and elastic strokes. First of all, they put a white dot in the center of all spouts, then the noses of roses and daisies are edged with dots, and the spouts of the bud and rose are circled with a white arc. And then the animations on the rose (those that are located along the “meridians”) are finished with very elegant strokes.
Everything! We learned to write flowers! Advice: make the animations on the flowers only as shown in the picture. This is a tradition. And tradition must be respected.
Master A.V. Sokolova offers 18 types of Gorodets flowers- roses, daisies, cups, multi-petal flowers resembling field geraniums.

It is impossible to imagine all the richness of flowers invented by Gorodets craftsmen over 150 years of work in the craft. Here are shown only the most basic, common and beloved by city dwellers. First of all, it's roses.
In the 1930s, working with the famous masters of Zhostovo trays, the famous Russian artist P.P. Konchalovsky argued that painting a rose is as difficult as a portrait of a person. But to paint this regal flower for masters of folk art is not only difficult, but also joyful, otherwise Zhostovo and woodwork painters, embroiderers and even blacksmiths would not turn to it so often.
Residents of the city have never tried to make their flowers look like natural ones; the conventionality of decorative techniques is not only not hidden, but even emphasized. A fantastic image of a flower is always created and it is done skillfully, with extraordinary invention and inspiration.
Among the six types of roses presented in the picture, there are no two identical in shape, neither in color, nor in the finest whitening details. The author of the mural acts here as a subtle colorist: roses are not just red, blue or pink - their subtle color shades are difficult to describe in words. No less diverse are the forms of roses: the cutting of the middle of the flower, the number and pattern of the petals vary. Some of them are round, others are gently curved, others are pointed. Each Gorodets flower has its own unique character.
And rose, and kupavka, and chamomile at first glance at them seem very intricate and difficult to perform. At first, it is difficult to understand how to start working on each flower form. But it should be remembered that even the most complex forms in folk painting are made up of a number of simple elements.
There are several basic principles underlying the creation of most Gorodets flowers. Some of them are based on the so-called bullseye - a fairly large circle, made with a medium-sized brush. Based on its development with additional paints and graphic cuts, you can create a fairly large number of different colors. This is how Gorodets roses, cups and daisies are formed.
Other flowers - let's call them field geranium- have a small round center-berry and light petals of various patterns, the semi-transparency of which is emphasized by the finest white shading. For the final decoration of flower forms, along with whitewash, black is often used, a very favorite color in Gorodets painting.
There is another artistic principle for writing Gorodets flowers - these are the so-called flowers by texture. The fact is that traditional Gorodets works were painted, as a rule, on colored backgrounds, but starting from the 1950s, works with natural unpainted wood as a background for painting began to prevail in the assortment of craft. In this regard, the masters had to solve quite a lot of new artistic tasks. Experienced artists of Gorodets found original decorative solutions for compositions, not only adapting the Gorodets color palette to the writing in terms of texture, but also creating new original techniques for writing colors. Fragments of unpainted wood were incorporated into the structure of the flower itself.
Bibliography