Painting a cutting board for beginners. How to paint wooden surfaces stylishly and beautifully. Painting under Khokhloma - technology
- wooden cutting board,
- brushes and acrylic paints,
- glass of water,
- colorless varnish.
- Gouache paints - yellow, green, black and red
- Squirrel tassels 2 and 3
- Can of water
- A soft cloth to remove excess paint
- Small white plate without patterns, for a palette
Khokhloma painting is quite popular. Such a painting does not require too much skill in drawing, the main thing is to put a little effort, perseverance and attention.
As an example of a mural element, you can draw this:
Twisting lines, berries, flowers and birds are welcomed in Khokhloma.
First, draw the base - a winding line. And then you start drawing the berries, and then the leaves.


Everywhere you need to start with the main winding lines, and then paint.
I propose to paint a cutting board in the style of "Khokhloma".
For work you will need
First of all, let's mix the paints for a golden color. For this we take the yellow and metallic colors.
We begin to draw the stem.

draw a berry at the top

then two more berries

just below, we also draw a twig with berries

on the left we draw a twig with leaves on it

now a twig with three leaves, and in the middle a curl

start drawing the background

continue painting the background

paint over the background completely


cover the side of the board with golden paint

now we cover the board with transparent varnish. Everything is ready!


Painting Khokhloma painting even a child can do it. The basis of such a painting is plant elements and sometimes birds with fish. These are mainly twigs, berries and leaves, all work is done in four colors: black, red, gold and green.
Even a child can handle curls, circles and dashes:

First, we draw a drawing with a pencil, you can sketch from the Internet, and then we begin to paint, starting with the largest elements:

After we have painted everything Large with the color we need, paint over the background with black. After the background has dried, add additional touches to our twig, paint over the blackness of the background.
If painting is done on a wooden surface, after drying, it can be covered with several coats of alkyd varnish with intermediate drying.
Here are a few elements and step-by-step master classes for drawing Khokhloma painting:


Video master class on creating a Khokhloma painting with your own hands:
If you study with your child, then you need to start with gouache (4 colors - yellow, black, red and green) and drawings on paper, studying the required patterns, and then, having studied the main techniques for drawing flowers, berries and blades of grass, you can take up wooden planks, wooden boxes and paper boxes made of papier-mâché for decoration with acrylic and oil paints. Be sure to cover at least 2 layers of varnish on top (but not nitro - it spoils the oil paint).
The drawing is located on a black or yellow-gold background, the marking of large elements is done first, then medium and only then small ones. At the end, small curls, strokes and dots are added. With each color, at first, everything is painted in turn, it is allowed to dry well and only then the next color is taken.
It is better to start the study with the main elements:
Kholm painting was very popular in the time of Russia, but now it has gone out of fashion, and the trend for Kholm painting has remained.
Kholmskaya painting is ideal for coloring a variety of dishes, kitchen utensils and just for painting walls.
Even a child can learn to draw with this style, there is nothing difficult here, because in this technique they mainly use vegetation, sometimes animals.
Here are some examples you can draw yourself:


Also, it will be very useful to watch a special video clip:
Khokhloma painting is very exciting. Previously, they taught this in ordinary Soviet kindergartens, because I remember some of the lessons. Now it is no longer fashionable and children are taught completely differently. If you do everything according to the old custom, then this sophisticated technique... But for the children, they made it simplified and understandable.
So, we need to work:
To begin with, we start from simple elements, which in the Khokhloma painting are called grass. It is performed in separate rhythmic strokes. The brush must be held perpendicularly with three fingers.
Here are the main and basic elements of grass.


Now for a practical lesson. Looking at the bowl, which is decorated by the master, children are given the opportunity to come up with an ornament themselves and paint with a pattern grass wooden spoon.

And this is already a herbal ornament using kriule.

Criule serves to emphasize the rounded shape of the product.

More important patterns leaves.

Combining all these patterns, you can paint pottery in a very original way with your child.
Draw patterns of Khokhloma painting in the form of curls with berries, leaves, flowers. Draw a wavy line from which curls are drawn on both sides. On each curl, draw two leaves and a berry at the end of the curl. You can draw a pattern of Khokhloma painting in the form of several curls, one black curl and from it of the same shape from two to four colored curls, for example, two green, two yellow. Below are several patterns of Khokhloma painting. For a sample for training, you can take the grass pattern, practice on a separate sheet of paper, and then draw on a blank sheet. You can draw a pattern on the image of a jug or plate.


It sounds ridiculous, but drawing in the Khokhloma style is done using exactly the same technique as the painting of dishes, which was done in ancient times in Nizhny Novgorod and the surrounding villages. Each element of the picture is done with one paint, after which the picture must dry. As soon as you are sure that the colors will not mix, you can take another paint and direct it with the necessary elements:
Pencil is even easier - no need to wait for the paint to dry:

You can perform a drawing in a graphic style, simply repeating the Khokhloma style. If you want to follow all the rules, then you should take colored pencils.
Khokhloma painting is beautiful painting on dishes that were used in the 17th century. The name is given by the area where the painting comes from, from Khokhloma, from the Nizhny Novgorod region. Khokhloma painting appeared thanks to the craft of masters from that area.
Before painting the product, you first need to grind spoons, mugs, planks and other utensils on a wooden machine, make a flat surface, then evenly cover with linseed oil in several layers, make a layer of aluminum powder. After that, you can apply painting.
Khokhloma painting is an ornament with the appearance of plants, twigs, berries, flowers, symbols, curls. Often red, yellow, black, as well as green and others are used in such a painting.
The finished item is covered on top for strength.
Oil paints are used.
There are different techniques of Khokhloma painting. Pattern gingerbread - This is a large pattern in the center, from which smaller patterns branch off.

There is also a pattern under the background - kudrina which is executed in yellow and red paint on a black background.

To complete a drawing, it is necessary to use creativity, invention to create ornaments. To complete the pattern yourself, there are baselines, symbols from which you can start learning to draw. Simple elements are available even for a child, it is also useful for children to learn painting, this develops skills.
I suggest making a board painting at home. Take a board, as well as gouache paints, PVA glue, brushes.

You can make a drawing for painting yourself or take templates on the Internet. Then you need to copy from paper to board.
First of all, we will treat the dock with egg white as a primer. After processing, let it dry.

Following the egg white, cover the entire product with gold paint.

We paint the berries with bright paint.

We draw the veinous part of the leaves.


Paint the entire background around the outlines with black. Then let the paint dry completely.
Wooden decorative utensils appeared later than earthenware. Cups, bowls, scoops with outlandish bends of handles imitating the necks of birds, painted spoons, tuyeski for storing berries, chests, boxes and other wooden household items in the Russian hut had ornaments, drawings or carvings. For every county, province there is specific traits drawings that distinguish them from many others. Wood painting can be schematically divided into two main categories - floral ornaments and popular prints (landscapes and subjects of folk life).
Wood painting can be schematically divided into two main categories - floral ornaments and popular prints
Without further ado, the masters gave the name to the painting by the name of the city, near which this style was born.... The main colors of painting in Russian villages were black, red, yellow. They are characteristic of ornamental techniques that appeared earlier than those in which more primary colors and their shades are used.
Features of the Mezen painting
For Mezen painting typical images of deer and horses... They are drawn carefully, and the image of a person is applied purely schematically. Each sign of the pattern has its own interpretation in this painting. In order to correctly draw up a drawing of a product, you need to know what this or that image means. Not all of them can be organically combined in one drawing.

The Mezen painting is characterized by images of deer and horses.

- The movement of the sun across the sky is represented by red horses.
- Heavenly women in labor, giving life to everything on earth, were depicted in the form of deer.
- Swans, ducks, geese symbolize the souls of deceased relatives who protect and warn family members from filth, help in difficult times.
- Fir-trees are a symbol of masculine strength.
- The tree of life was depicted with roots, spirals going into the underworld. By counting the rhombs on the trunk, you can judge how many genera unites the family. The top of the family tree is crowned with the sign of heavenly peace.
This painting originated before the baptism of Rus, which can be clearly traced in pagan symbolism. Spinning wheels and sketches with the Mezen multi-layer painting can be seen in local history museums.
Gallery: painting on wood (25 photos)


Severodvinsk painting: its features
Severodvinsk painting can be called international. Over time, its northern roots were mixed with motives introduced by Old Believers, Poles, merchants and peasants looking for a better life from other regions who migrated to the north.

Severodvinsk painting can be called international
It is possible to recognize the Severodvinsk painting, despite the use of red, yellow and black colors in the drawing, according to the following characteristic features:
- The tree of life, reminiscent of an outlandish flower, where two doves are sitting on the crown hemisphere. A gift made of wood with such a motive was presented to the newlyweds on their wedding day. This tree had one leaf more than the parents of the newly-made spouse.
- The drawings may contain mythical creatures - the Sirin bird, mermaids, griffins.
- Of the animals, the inhabitants of Severodvinsk depicted a lion and a bear.
- The drawing is divided into three parts. In accordance with the ideas about the structure of the world, he was divided into images of the underworld, earth, and celestial spheres.
In many respects, the Severodvinsk painting is similar to the Permogorsk, Rakul, Boretsk.
Painting without religious overtones
Matryoshka dolls, wooden dishes are often decorated in the style of Polkhovo-Maidan painting. It consists in applying an uncomplicated floral ornament to the wood. In this painting, there are no specific rules in the combination of colors. The only thing that is required is to get a bright, joyful toy.
Suitable for decorating wooden volumetric blanks and flat surfaces.
Petrich painting consists of leaves, petals, berries. This type of folk craft pleases with the brightness of colors.


The elements of the Polkhov painting are similar in application technique to the Khokhloma painting. There are no strict rules in the selection of colors and design elements in this art craft.
Khokhloma painting obeys the generally accepted rules of Russian folk crafts - yellow, black, red colors are used. One of them is the background for the drawing, applied with the other two colors in stages.
Khokhloma painting is a classic. It uses only three colors, one of which is the background of the picture. It can be any of the flowers used in traditional Russian painting. They are all contrasting to each other, which allows you to paint and create a 3D effect with the least effort. There are no halftones in this painting, only bright saturated colors.

Using the same smear technique, with varying degrees of pressing the brush to the surface to be painted, you can recreate the Gzhel painting. This type of painting differs from Khokhloma and Petrikovskaya in that the blue pattern is applied to a white surface. Perhaps for a beginner, the choice of one of these three paintings to start his career is the easiest.
How to make a spot painting of a box (video)
Paints for classic wood painting
Classic painted boards, boxes, household items, with proper selection and processing, do not change color under the influence of sunlight or water. Since ancient times, masters have used tempera paint in their work. The most ancient recipe for drawing up paint is also used by modern professional wood painting craftsmen. The peculiarity of the composition is that the dye is ground on the egg yolk. This component is the foundation.

Since ancient times, masters have used tempera paint in their work.
For some time in production, they tried to replace tempera with easier-to-use and cheaper oil paints. This experience was abandoned very quickly due to characteristics such as discoloration on exposure to the sun. The radical black color, which should be a charcoal shade, changed under the influence of ultraviolet radiation. Acquired a green and sometimes yellow tone. On the contrary, light colors darken. The second disadvantage of oil dyes is their ability to crack, flake off. V folk craft tempera returned again.
Tempera paint types
Characteristics of quality tempera:
- When working, it dissolves easily in water;
- It is homogeneous;
- Gives 100% coverage (the drawing is not transparent);
- After drying, it is not possible to wash it off with water;
- The hardened layer does not crack, unlike oil and watercolors;
- When stored in a closed container, mold will not appear on it, it will not thicken and will not delaminate.
The composition of tempera is very simple, there are only two ingredients - an emulsion (base) and a colorant. The paint making process is quite time consuming. Tempera is made by hand, the base is laid out on a granite or marble surface, where it is combined with the pigment. A dry color scheme is rubbed into the glue or egg base with a chime - a crystal pestle. The process continues until the dye becomes uniform in color and texture.
Attention! Instead of a crystal chime, you can use a similar object made of hardwood, stone. Interaction with metals is contraindicated in paint ingredients.
Ready-made tempera paints
The name of the modern tempera is consonant with the base on which it is made:
- Egg - in the base, made in an industrial environment, an artificial emulsion is used. It consists of an egg, vegetable oil, oil varnish or turpentine.
- Casein paint is made on the basis of a complex protein extracted primarily from animal milk. The casein emulsion contains oil and resins. The quality of this tempera is higher than that of egg tempera.
- Gum arabic is named after one type of adhesive base used in the manufacture of color-saturated paint. This ingredient can be substituted for glue made from the resin of other fruit trees. In our latitudes, cherry glue is more often used.
Reference: Dextrin, a polysaccharide made from potato starch, is an intermediate stage between starch and glucose. Gum arabic means gum arabic - it is acacia resin hardened in the air. Extracted from plants of southern latitudes.

The name of modern tempera is consonant with the base on which it is made
Artificial paint emulsions for aspiring artists are divided into three main categories of PVA, oil wax, acrylic.
What acrylic paints are best for painting on wood
It is better to apply acrylic paint on damp wood using the “Impasto” technique, if you need to paint a large element of the picture. But with undiluted acrylic it is difficult to make curls and elongated leaves in one touch, as required by folk art. The effect of lightness and airiness of the floral motif depends on the degree of adherence of the brush on different parts of the painted surface.
The matt emulsion serves as the base of the paint, the color is given to it by pigments. To paint drawings in a folk style, you will need high-density acrylic. When dry, it should not become transparent. It follows from this that specialized paint is not suitable for drawing a picture on glass. As well as paint for puff pastry and painting on a cloth base. The only correct choice is to purchase paint for painting on wood.
How long does painting dry
The longest drying time for the paint, which is used in the work to create the main background. This is due to the fact that it must create a perfectly even tone, that is, it is applied with a thicker layer than the drawing itself. It will take no more than an hour to dry an acrylic base applied to a surface moistened with water. Approximately the same time passes when applying tempera.
Small elements applied in a thin layer will dry almost instantly, more solid strokes within 15-20 minutes. But this does not apply to paint that had to be diluted with water. The peculiarity of acrylic is that water makes the paint dry much faster.
It is necessary to work very quickly with acrylic in contact with water. The more water is used to thin the paint, the faster it dries.
How to color a wooden block for a cutting board: a master class for beginners
Preparing the board consists in soaking it with potato starch. It will hide all small imperfections in the board and give a thin undercoat. This process can be simplified by covering the board with linseed oil. When choosing northern motifs as an ornament, in which tone is not used, you can use a light-colored stain as a primer.

You can paint a wooden blank with gouache. This technique is also available for children.
- Taking a sheet of paper for drawing, highlighting on it an area corresponding in size to the one that needs to be covered with a pattern on the wood, you need to mark the areas of the largest decor elements. Outlining their location, as shown in the figure.
- At the second stage, the image is detailed - drawing the contours.
- Using transfer paper, the image is transferred to a prepared, fat-free board soaked in potato starch.
- So that different colors do not mix, you can take a burner, make small indentations along the contours. This contour will prevent the paint from mixing. When working with decorative acrylic paints, you can replace the burning process by applying the contour and thin elements directly through the thin tube dispenser.
- After the contour that rises above the surface has dried, it must be filled with color.
- The final stage of the work will be varnishing the painted board. It is applied in 2-3 steps. Each subsequent layer lays on top of the thoroughly dried previous one.
Attention! The second coat of varnish will dry twice as long as the first, as it will dissolve the previously applied coating. The result is a monolithic, very durable varnish layer.
Simple patterns for beginners
Painting on wood does not tolerate small details and winding lines. The irregularities of the edges of the elements are reproduced by strokes with a semi-dry brush on a moistened surface.
The simplest, but rather spectacular, are the drawings of rowan bunches, flowers with uncomplicated leaf shapes.

Painting on wood does not tolerate small details and winding lines

The simplest petals for drawing will acquire volume when they are darkened at the middle. To do this, it is enough to make a few strokes-rays. Berries are generally easy to draw. The three-dimensionality of rowan bunches is given by the black points of the ovary, which are arbitrarily located on the image of the berries. This technique makes the drawing "convex" when creating the center of the flower.
Small flowers are just as easy to draw, they are schematically composed of approximately equal points. Small elements are located on top of large ones, this gives the picture volume. The symmetry of their arrangement is not important. More attention needs to be paid to the distance between parallel long leaves.
Often, when we come to a housewarming party, we think in stereotypes and give tea sets or dishes. But what if each of the guests comes with a set of cups or plates? We advise you to pay attention to such a wonderful gift as a cutting board, especially since you can paint it yourself. Or rather, not even paint, but burn your own drawing on it! The topic of pictures for burning on a cutting board is very popular today, we will talk about this.
Even if you have no experience in pyrography or wood burning, it's okay, this lesson is available for everyone: for adults and children. There is absolutely nothing to be afraid of, because pyrography is not difficult, but very exciting. You can see an example in the photo.
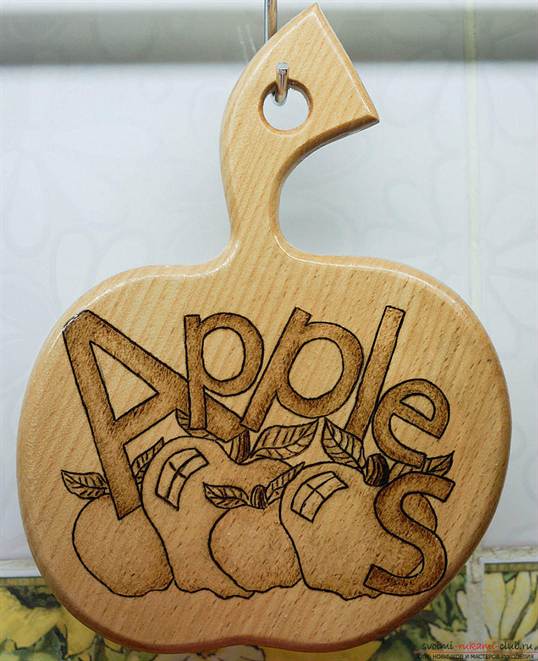
Woodburning patterns are easy to find on the Internet, and there are a wide variety of templates and stencils that are suitable for beginners. The main thing in this business is to be patient and have 1.5-2 hours left for a simple drawing.
What is needed

First of all you need pyrograph... This is such a special wood burner. You can buy it at craft stores. Also, the pyrograph is included in a special set for wood burning. This set includes a board (not a cutting board) and a ready-made stencil for burning.
It is very easy to buy a set; today they are common in almost all hobby hypermarkets and handicraft stores.
Also, of course, you will need cutting board... It is best to choose a light wood plank. Linden or birch is perfect. The next thing that is needed is sandpaper... Acrylic or watercolors are also useful. paints, to decorate the board with color. Additionally you will need wax to wax the finished design after painting. Waxing will add saturation to the image and preserve the colors of both wood and paint for a long time. You will also need stencil and simple pencil to translate the drawing onto the tree.

Learning to translate

Many people ask the question "How to transfer a drawing to a board?", And so this is done using a stencil. It is necessary to find and download pictures of fruits, flowers or animals that interest you, since these are the most commonly used patterns for burning wood. It is best to choose simple templates, especially if you are pyrography for the first time.

We print the downloaded stencil and cut out the figure if the figure in the picture is empty. If there are additional internal parts, use carbon paper. Place it on the tree, place the printed stencil on top and circle the drawing. Try to keep the image from shifting.

There is another way to transfer a picture to a board. You also need to print your favorite stencil, printed in mirror image. Prepare a bowl of water, decoupage glue, wood varnish, acrylic paints, a brush and a sponge.
Cut out the stencil or finished design, then carefully coat it with decoupage glue and attach it to the wooden surface, pattern down. Smooth out the pattern with a sponge so that it does not "bubble" and that there is no excess glue left. Let dry. It is best to leave the work to dry overnight.

After drying, moisten the motif with a damp sponge and start rubbing off the paper until the design appears on the wood. Dispose of all paper carefully. Then, with our fingers, we begin to rub the remaining paper, making pellets that remain on the wooden surface. We brush them off the tree, and a finished drawing remains, which, after complete drying, can be supplemented with burning (for example, burn out its contours) or simply decorate with paints. Then cover the work with varnish.

We master the technique
After the drawing is outlined on the board, it's time to start burning. Make sure the board is completely dry. Then re-heat the burner so that the feather turns dark red.
Be careful when working with a hot pyrograph, it is very dangerous! It is better to do it more slowly, but there will be no consequences.
Burning out is best done from the outline to the center. That is, first we outline all the outer edges and only then move on to the inner ones. It is best to burn in separate areas: have worked on one, go to the next, but in another part of the picture. This will allow the drawing to cool down evenly and not create extra lines or stray strokes. When the work is completed, it can be decorated with paints. And then - treat with wax so that the board has a shine.
Let the owner of the house decide for himself whether to use your gift in everyday life or to hang it on the wall or put it on a shelf. In any case, your gift will find a worthy place in the kitchen and in the heart of your friend!


Gold, red and black- you can find such a combination of colors on many objects of Old Russian applied arts and works folk craftsmen... For the "khokholoma" these colors are especially important: Red gives warmth and softness to artificial gold, a black enhances its radiance. In addition, the circular surfaces of objects do not have sharp contours and diffuse light. It is characterized by two types of ornament: "Horse painting" and painting "under the background"... Herbal ornament takes the leading place in painting: branches, long stems, "grass", leaves, berries, flowers. The traditional flavor of Khokhloma products is a combination of gold with cinnabar and black.
"Golden Khokhloma" - painting under the background.
Step # 1
Sketch
Step # 2
On tracing paper, compose a composition of flowers, leaves and fruits. Do not forget to leave a frame of 1 cm. Use ready-made compositions from the books and coloring pages I have laid out on this topic (in the section "drawing, painting"). Then place the tracing paper with the drawing on the board and translate, tracing the drawing with a non-writing pen. It will leave a sagging mark on the acrylic layer.
Step number 3
We start with black (with the addition of green, so that the color is velvety) with a brush No. 1 to trace the contour of the drawing, not forgetting about the stem, antennae, berries.
Step number 4
We paint over all unnecessary with the same black color, without painting over the frame (with a brush number 2). We make a black thinning on the leaves and on the lower part of the flowers ("horseshoe with a goatee") with a brush # 1.
Step number 5
On the top of the flowers, expand black with "brackets". color (brush number 1).
Step number 6
Now we will write in red. We paint over the strawberries with red, and the smaller round berries are mixed with yellow with red (so that they differ slightly in color from strawberries). On them, leave the glare in the shape of the month unpainted. Let's add the flowers with the elements "horseshoe" and "bracket" with red. We circle the frame in red, leaving a golden strip of 0.5 cm.
Step 7
Matches or reverse side put the pokes on the brushes: in red - on the beard (3 on each), in black - under the brackets (3 under each), in yellow - on round berries. On the strawberries, use the # 1 brush to make the “droplets” thinning in yellow.
Step number 8
In green color, make the quickening
On top of strawberries (optional) in the form of droplets or blades of grass.
Step number 9
With the same green, we begin to draw the grass along the stem and in free areas. As if we pull the droplets away from the stem - leading. The more perpendicular the droplets are, the more graceful the bush will be. You can start it with a long antennae, around which droplets can then be added. It is better to write pot-bellied grass, press on the ear, just at the turn, and slowly raise the brush, adding the tip of the blade of grass with the tip of the brush. The grass alternates with tendrils and droplets. In some places we will simply draw out long antennae.
Step number 10
Let's dilute the pink color (from white and red). With a cotton swab, put on free places and elongated antennae pokes (5 pokes in a circle), forming a flower.
Natalia Bondareva
To familiarize children preschool age With Khokhloma painting I made some cutting boards. And I offer you mine painting master class cutting board .
Master-the class is designed for teachers of preschool and school education, children of senior preschool age, parents.
KHOKHLOMSKAYA PAINTING -
IN THE GREEN HERBS.
GROVES-FOREST.
SILK SPLASH
SUNNY HONEY
Khokhloma painting- one of the most popular types of Russian folk wood painting that have arisen long ago and have survived to this day. This and wooden spoons, and cups, and pots, and children's furniture and much more. "Flaming Khokhloma» know everywhere! The main elements Khokhloma are red juicy berries of currants, wild strawberries, mountain ash, flowers, golden leaves, twigs, etc. Often there are birds, fish and animals.
To work for us will need:
- wooden board
- acrylic paints: black, gold, red, green
Gloss acrylic varnish
Pencil
Brushes of different numbers

1) Prepare board for work... To do this, we will process the surface of our boards sandpaper until smooth.

2) Then the workpiece wooden board cover with gold acrylic paint.

3) Apply on a dried gold surface with a simple pencil khokhloma pattern: leaves, berries, flowers.

4) Gently outline the outline of the drawing with black acrylic paint with a brush # 1.

5) We paint over the bezel of our boards in red.

6) We paint over the strawberries in red,

and currant berries - burgundy.

7) Gently fill the background with black acrylic paint without painting over the frame. We make a black leaf on the leaves.

8) With green paint we draw the stalks of the berries and curls at the stems, with yellow paint we draw small flowers.

9) We take varnish and use a brush or sponge to apply it on the board, let it dry, then apply another layer of varnish.

10) And now, our the board is ready!
Related publications:
Abstract of the open lesson "Acquaintance with the Russian folk wooden toy-whistle, painting the bird of the whistle" Purpose: To acquaint with the Russian folk toy - the whistle. To teach children on the silhouette of a bird to build an elegant pattern using alternation.
To familiarize older preschoolers with the Gorodets painting, I painted a wooden plank on my own (I helped me in cutting the plank.
Mezensoky painting is called, In each drawing is good. It will respond in your heart, It will be a gentle fairy tale. (Svetlana Ledkova) For this painting.
In October 2015, I had an open lesson with the families of pupils on the topic "A spoon in the tradition of a Russian family." Wooden spoons came.
Hello colleagues, I invite you to attend an open lesson on the type of Khokhloma painting "Lipetsk patterns". Where you can see the work.
Tasks. 1. Continue acquaintance with the Gorodets pattern, its color, peculiarities. 2. Exercise in drawing Gorodets flowers, develop.