Japanese cold porcelain do-it-yourself. Cold porcelain crafts for beginners: tips and tutorials. Sakura flower: cold porcelain master class
Cold porcelain can be called a new material, as it was invented at the beginning of the 20th century in Argentina. It differs from ordinary porcelain in that it does not need to be fired at high temperatures, hence the name "cold porcelain". You can cook it at home from the available ingredients. Unlike clay and plasticine, this material has undeniable advantages: it does not stick to hands, it hardens well after 48 hours, it is easy to color, plastic and easy to use. Not only adults, but also children can make crafts from cold porcelain, since it is absolutely harmless. In this article we will tell you the recipe for cold porcelain, from which you can make a variety of crafts.
How to make cold porcelain with your own hands
Materials for making cold porcelain:
- cornstarch - 1 cup;
- PVA glue - 175 ml;
- water - 100 ml;
- the cheapest hand cream - 1 tsp;
- glycerin - 1 tsp
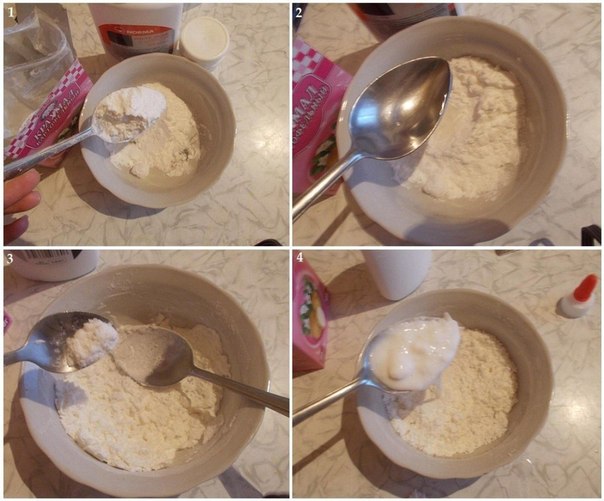
1. Put everything except the cream into the pan and mix thoroughly until a homogeneous mass is formed. You can knead in a regular bowl, and then pour into a pan.

2. Now put the pan with the mixture on a small fire.
3. We heat up until the mass begins to lag well behind the walls. Remember to stir constantly so that the mixture does not burn.


5. Lubricate your hands with cream, and sprinkle the table with starch. Knead cold porcelain until it stops sticking to your hands.
6. Mass for modeling is ready. It must be used no later than 36-48 hours from the moment of preparation, since after this time the mixture hardens.

If you want to make a colored porcelain craft, you need to mix acrylic paints or any dyes into the finished mass. Mix well to get a uniform color. When kneading, keep in mind that the mass is hot, so it is well kneaded and practically does not stick to your hands.
Watch a video on the topic: we make cold porcelain at home
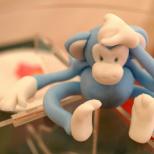
Cold porcelain can be called a unique material for modeling. From it you can make a variety of figures, such as flowers, dolls, animals, as well as details for applications or decorations. Products from it freeze in the fresh air. Thanks to the uniform texture and smooth surface, all cold porcelain products are beautiful and durable.
Many would like to have porcelain items at home, as they decorate the room and create comfort. But few people realize that there is a recipe for cold porcelain without cooking, which everyone can master. Thus, it is possible
Important to know: cold porcelain is a very cheap and safe material. To make dishes or a figurine out of such porcelain, it is not necessary to have professional skills and spend your whole life modeling. Now there is an opportunity to do crafts from cold porcelain with your own hands for beginners.
Historical aspect
Most historians are inclined to believe that the Chinese began to produce porcelain for the first time in the 6th century. In ancient times, services were made from the material, from which they drank tea. This utensil was also used in the Chinese tea ceremony.
The very first porcelain had blue and greenish hues, which distinguished it from other materials. Previously, the Chinese made art in the same style: necks in the form of animals and vessels similar to dragons. White porcelain in China learned to do only after the X century. After that, trade relations between the Asian country and Europe have strengthened significantly. Europeans liked the unique porcelain products from China.
Although the porcelain formula was not immediately unraveled in Europe, the best minds of that time worked on it for many years. And only by the 16th century, soft porcelain was invented in Italy, which immediately became popular in Germany and France. But in the XVIII century, the famous alchemist Friedrich Bittger discovered hard porcelain, from which they began to make the most beautiful dishes. There were even their masters in painting. European porcelain was very different from other materials, as it had special signs. They began to open porcelain factories in England, Germany, the Czech Republic and other cities.
In Russia, the first porcelain factory was erected in the middle of the 18th century in St. Petersburg. At first, Elizabeth attracted foreign specialists to set up a production line. But later, Dmitry Vinogradov mastered the domestic method of obtaining solid material from local materials. A few years later, the Imperial Porcelain Factory was renamed the Porcelain Enterprise. M.V. Lomonosov.
Russian factories began to focus on a wide range of consumers at the end of the 19th century. In this regard, the cost of porcelain fell significantly, and the production line was mechanized. However, even now there is a category of porcelain items that are made by hand. As a rule, these are very expensive high quality services. Russian porcelain is valued all over the world, so it is sold at auctions for huge sums of money. Private collectors are ready to give away a fortune to get a treasured porcelain item.
Do-it-yourself cold porcelain master class for beginners without cooking
In its original form, porcelain resembles clay, although after thorough drying it hardens. Therefore, any jewelry and accessories can be made from porcelain, including flowers, shells, buttons. At the end of modeling, it is possible to sprinkle with beads for beauty and varnish.
They learned how to make cold porcelain only in the 19th century, it was then that the craftsmen began to make figurines of stunning beauty from this material. And although there is no exact information about the discovery of the material, many scientists are inclined to believe that the Argentines became the discoverers.
However, a large amount of information about the professional master Pyotr Ivanov has been preserved in Russia. He studied art at the Imperial Porcelain Factory. After some time, Peter began to create original objects from cold porcelain. According to the documentation of those times, it was this master who first made flowers from a unique material. These flowers then began to decorate perfume bottles that were delivered to the imperial family. Thus, Peter Ulyanovich became famous throughout the Russian Empire. He was able to make his cold porcelain recipe at home without cooking. In this regard, everyone can do-it-yourself cold porcelain master class flowers video.
Although there are earlier archival documents that confirm the existence of cold porcelain. For example, chronicles have been preserved in China that mention different types of moldings of their cold porcelain. Despite the fact that the recipe for cold porcelain at home is similar to the material created by Ivanov Petr, the name of Chinese porcelain is different.
Cold porcelain crafts for beginners
Of course, figurines and various cold porcelain crafts turn out to be exquisite and beautiful. However, they are no less demanding of themselves. It is important to remember that you need to store products away from liquid, moisture and sunlight. The fact is that cold porcelain tends to absorb liquid and become limp. This means that a toy or figurine may lose color, luster and structure over time. Therefore, it is best to put vases and figurines in a dark place.
Before you make cold porcelain at home without cooking, you need to learn that crafts, molds and figurines should be in a room with optimal temperature conditions. The structure of the material will collapse if the room temperature is below 10 degrees Celsius. At this point, moisture particles crystallize, which negatively affects the quality of the product. But the heat also destroys cold porcelain, as a result, the figurine crumbles. All these nuances should be considered before making cold porcelain with your own hands a master class for beginners.
But experts have learned how to extend the performance of cold porcelain products. They are simply varnished. Then beautiful objects are not afraid of either moisture or the sun. At the same time, the product retains not only its shape, but also its luster and color.
Cold porcelain jewelry
According to experts, this material allows you to sculpt anything, including jewelry and interior items. At the same time, each novice master can bring all his ideas to life by creating unique hair clips, flowers and other necessary things. Even for children, you can make gifts: cartoon characters, fairy tale characters, animals and much more. In any case, cold porcelain figurines will decorate any room in the house, including the bedroom and children's room. Cold porcelain without cooking from potato starch is within the power of every person.
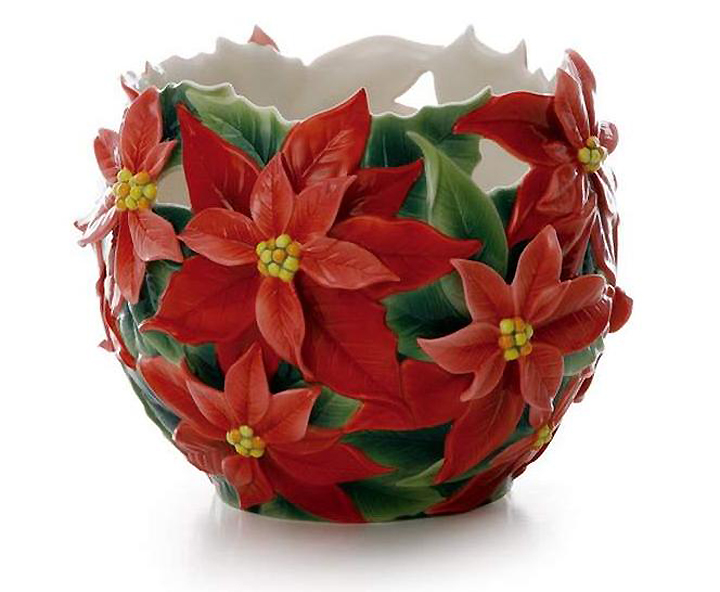
If a person has creative thoughts, then you can make pots for your favorite flowers. Indeed, now it is difficult to find original things in ordinary stores, since most are produced in ordinary factories. But do-it-yourself cold porcelain recipe makes it possible to create elegant and original items for the home: photo frames, lamps, vases, flowerpots, sculptures and much more.
You can also decorate an apartment or house with cold porcelain: flowers, greenery, garlands, figurines of exotic animals, thematic compositions, figurines, etc. There is no need to go to the store for a gift, as it is possible to make flowers from cold porcelain and polymer clay with your own hands. contact. Relatives, relatives or a girl will be happy with such a surprise.
The process of making cold porcelain
To prepare polymer clay, you do not need to have any special knowledge. There are several ways to do this, but in this case, the simplest option will be considered. You need to take potato, rice or corn starch, an emulsion of polyvinyl acetate in water, glycerin and cream for children. Then mix everything in the same proportion.
After thorough mixing, leave the consistency for 30 minutes. During this time, the components will turn into the mass necessary for sculpting. It is important to know: in no case should cold material be placed in a cold room or refrigerator, it should be stored at room temperature. Experts recommend sculpting immediately after preparing the consistency.
In some cases, people add citric acid to the material to improve the performance of products. This substance creates the effect of conservation.
If liquid is present in the composition, then you need to be prepared for the fact that the product will turn out to be fragile. Over time, the figurines will begin to emit an unpleasant odor, and the structure of the material will significantly weaken and change.
Ingredients such as food coloring and chalk give figurines a vibrant color that lasts for a long time. Although finished products can be painted after complete drying, but not earlier than a day after sculpting.
To create a real masterpiece from cold porcelain, you will need the following tools:
- Cosmetics for decor.
- Paints, brushes.
- Toothpicks.
- Some construction tools.
- Protective gloves.
- Towel, napkins.
- PVC glue, metal wire.
- Scissors.
- Rolling pin.
If a person has a great flight of fantasy and a creative backlog, then in the process of sculpting, you can use threads, beads, fabrics and other accessories. These decorative elements will allow you to create not only a beautiful, but also a unique piece of art.
For those who are not familiar with modeling for the first time, you can consider a more complex recipe for preparing the material.
It is necessary to mix PVC glue with cornstarch in a small container. Then add half a glass of plain water, a little glycerin and a spoonful of baby cream. You can also use an inexpensive face cream to prepare the mass. After stirring the elements of the mixture, you should get a smooth and pleasant to the touch texture.
It is worth noting that finished products dry for about two or three days. During drying, it is better not to touch them, but to let them dry completely. If after the preparation of porcelain, there is excess material left, it can be put into a plastic box and tightly covered with a lid. It is better to put the leftovers in the refrigerator until the next creative evening.
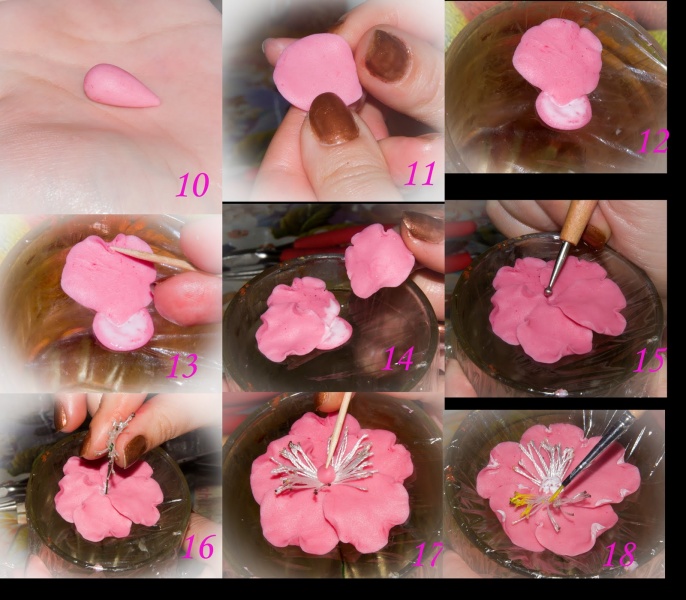
Cold porcelain flowers master class with step by step photo
Experts believe that it is better for beginner sculptures to start with simple objects. In this case, we will talk about the sakura flower. The material must be painted pink and white before sculpting. It is also necessary to cut the porcelain into cubes, then to make petals out of them. In the process of cutting the material, it is necessary to monitor the length, shape and width of the workpieces.
Having cut the material into small rectangles, you can begin to sculpt the petals. This will be the first step towards creating the original sakura. The edges of the flower should be white, but the base should be pink. After gluing the petals, small holes need to be made with a toothpick, which will be needed for the wire in the form of a stem.
As for the buds, they are glued to a green cup with a white border. In this case, it is worthwhile to securely plant the buds on the stem so that the flower is not damaged during transportation.
To create a “living sakura branch”, you need to try to create the same one from wire. First you need to collect all the metal blanks in one bundle, and then twist them beautifully to create a single composition. If all the steps are performed correctly, then the sakura can be put in a vase or in a pot as desired.
Also, those who want to do modeling have the opportunity to make such a flower as a rose from cold porcelain master class. In this case, the manufacturing process is the same.

Flowers from cold porcelain master class video
Now, to make cold porcelain with your own hands without cooking a master class, you can use open resources on the Internet. There are sites where not only thematic photos are shown, but also various videos are posted. Thus, beginners can see in detail the master class from professional masters.
Do not be afraid to do something with your own hands, the technology for making cold porcelain at home is very simple. It does not require a large number of components to create unique and creative items. It is enough to have a rich imagination and a desire to make a gift to your loved one.
If you use all the tips, you can create real comfort and your own style at home or in an apartment that will delight friends, relatives and loved ones. Well, the children's room can be furnished with amazing figurines and figurines made of cold porcelain. After all, now there are so many different characters that kids like. By creating a cartoon character with your own hands, you can get a lot of positive energy from a child in return.
Content
Such material for creativity as "cold porcelain" is very popular among craftsmen. Beautiful and very durable crafts are made from it. Today you can buy it in almost any specialized needlework store or via the Internet, or you can save money and make the material for modeling yourself.
cooking recipes
Making cold porcelain with your own hands is quite simple. There are many different recipes for preparing this material for modeling, but the main difference in preparation is the presence or absence of heat treatment of the mixture.
Advice! For beginners, it is better to use recipes without cooking, as this process requires certain skills.
In this case, recipes where you only need to thoroughly mix all the ingredients are perfect.
Recipe one
For this recipe you will need:
- starch, it is best to take corn - 2 tbsp. spoons;
- a few drops of vaseline;
- baking soda - at the tip of a teaspoon;
- PVA glue - 2 tbsp. spoons.
Cooking:
Pour starch into a bowl. Then add vaseline oil to it and mix everything well. After that, add a few drops of Vaseline to the mass, and then soda. At the very end, carefully pour in the glue. We mix everything thoroughly.
Recipe two
For cooking you will need the following ingredients:
- corn starch - 1 cup;
- PVA glue - 100-150 ml;
- cream for children - 1 tbsp. a spoon;
- vaseline - 1 tbsp. a spoon;
- vaseline oil - 1 tbsp. a spoon;
- citric acid - 1 teaspoon.
Cooking:
All of the above ingredients must be thoroughly mixed. After that, put the resulting mixture on a slow fire. Boil the mass until a dense lump is formed and the liquid is almost completely evaporated.
Recipe three
To prepare the material in this way, you will need the following ingredients:
- building glue PVA;
- corn starch;
- glycerol;
- any hand cream (ideal if it is greasy);
- citric acid or lemon juice.
Attention! Cornstarch makes the mass more elastic and almost transparent, which is important for the manufacture of beautiful and high-quality products.
Cooking:
First, mix all the ingredients in a deep bowl. Then we put it on a small fire and start cooking. The mass must be constantly stirred. When one large and rather dense lump is formed, the mass must be removed from the heat, put on a table previously lubricated with baby oil, and after the mass has cooled slightly, knead it thoroughly with your hands. If you need cold porcelain of different colors, then you can add dyes of the color you need while kneading. You can use both food and synthetic coloring pigments.
Important! When staining with synthetic dyes, it should be remembered that only an adult without allergic contraindications can work with the resulting mass.
It is better not to give such a mass to a child, in order to avoid the appearance of irritation, skin itching and all sorts of allergies.
Recipe Four
To prepare cold porcelain in this way, you will need:
- corn starch;
- baking soda;
- water.
Cooking:
We mix all the components and then put on a slow fire. Cook until a homogeneous dense mass is formed.
The basis for crafts is ready, now you can safely start making original and useful household items, jewelry, dolls and even paintings from cold porcelain.
You can learn another recipe for making cold porcelain without cooking from the video:
DIY options for beginners
For beginners, an excellent option for crafts from cold porcelain that you can make with your own hands are flowers that are simple in shape (lilies of the valley, hibiscus, peony, roses), the simplest figurines of animals and birds, jewelry with a small number of decorative elements.

Master classes on making jewelry with your own hands using cold porcelain are very popular.
Here is one of the options for making the simplest flower bud from cold porcelain with your own hands. The whole sculpting process is shown in detail in the photo.
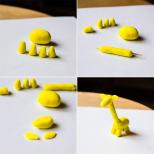
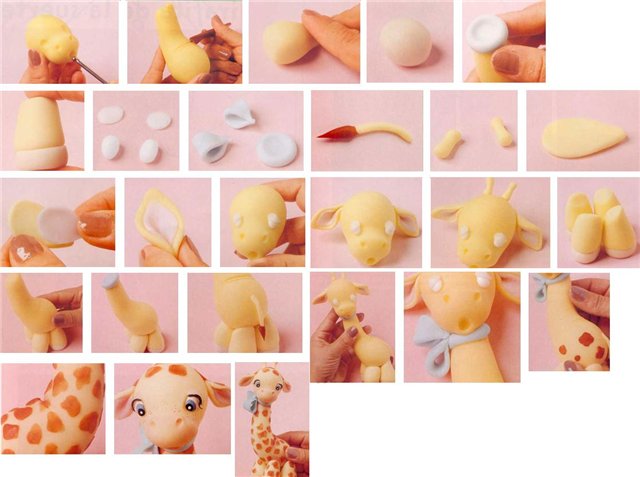
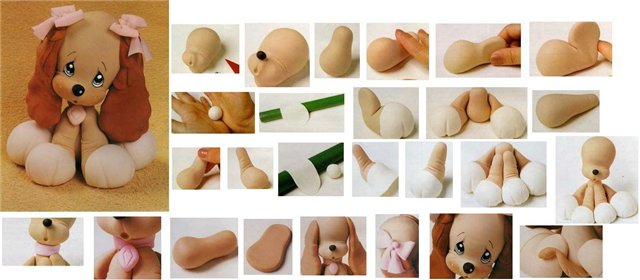
Animal lovers can try to fashion a cute giraffe or a sad puppy. Below are step-by-step photos of the entire process of sculpting these crafts.
After acquiring a certain amount of skills in cold porcelain modeling, one can start making more complex decorative elements and, consequently, more complex objects or decorations. The photo shows just a few ideas for creating jewelry using do-it-yourself cold porcelain rosebuds.
Cold porcelain is a mixture of glycerin, oil, glue and starch. There are several recipes for making porcelain that may be suitable for a beginner. But before you start doing it, you need to know that its shade depends on the recipe itself and the composition of the products. Products made from potato porcelain are grayish and dense, while those made from corn porcelain are airy, transparent and have a slightly yellowish tint.
Recipe number 1 - DIY cold porcelain
Ingredients: 
- One hundred and fifty grams of cornstarch and a little for kneading.
- teaspoon of glycerin.
- A teaspoon of white hand cream.
- One hundred milliliters of water.
- One hundred and fifty milliliters of PVA.
Cooking:


Often, craftsmen during cooking change the composition and thereby improve recipes. So feel free to experiment.
Recipe #2 - Improved Cold Porcelain Recipe
All the same ingredients as in the first recipe.
Cooking:

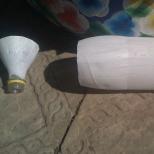
This porcelain will be smoother and more uniform. The picture on the right shows a mixture that is made according to the first recipe, and on the left - according to the second.

Recipe number 3 - Making cold porcelain from potato starch without cooking
Ingredients:
- PVA glue.
- Baking soda.
- Vaseline oil or Vaseline.
- Potato starch.
Cooking:

Phosphorus should be painted with all kinds of food dyes and paints (acrylic, oil, oil and others), to do this, add the color to the prepared mixture and knead so that the color is evenly distributed.

To paint a frozen finished product, apply dry food paint to the element with a brush, then hold it over the steam of the kettle. In this way, porcelain will absorb the dye and get a natural color.
How to work with cold porcelain?
- Use special tools (rolling pins, stick stacks, etc.).
- Lubricate your hands with cream before starting work.
- After kneading, the mixture should lie down for at least a day.
- Store in sealed packaging.
How long does cold porcelain dry?
Cold phosphorus dries depending on the thickness of the product (one or several days), while the size decreases. When drying flat figures, they must be turned over so as not to deform.
You can use the oven to speed up drying.
Cold phosphorus is a rather plastic material, almost everything can be molded from it. And to decorate products, you can use different materials: pieces of fabric, threads, beads, beads, and so on.
1. So that the lymph nodes no longer become inflamed! Sharing a wonderful exercise, all you need is ... 2. Say goodbye to blemishes, wrinkles, freckles and warts! 3. Deciphering blood tests. Be sure to save yourself, 100% useful! 4. A conference on cancer prevention was held at the Kashirsky Cancer Center. Here are the recommendations that were made at the end of it: 5. A folk remedy for lung diseases, which our grandmothers used to treat. Forget cough! 6. Izotov's oatmeal jelly or "Russian balm!" 7. Use this clever trick to avoid becoming a victim of ticks! I feel safe in nature. 8. Recipe for eternal youth Do not "throw" money on beauty salons! 9. CEDAR TINCTURE FOR MANY DISEASES. 10. 15 little beauty tricks that will be useful to any girl. ================================================= ============== 1. So that the lymph nodes no longer become inflamed! I share a wonderful exercise, all you need is ... Lymph nodes are the most important part of our immune system. They are something like a border outpost that prevents foreign substances from entering the body. Their main goal is to delay the infection and prevent it from spreading. The main weapon of our lymphatic system is lymphocytes, which accumulate and cause enlargement of the lymph nodes and even their inflammation. Many of you have probably experienced inflammation of the lymph nodes. To avoid this, you need lymphatic drainage, and "I Love Zozh" will tell you how to do it yourself. Inflammation of the lymph nodes Lymph nodes often become inflamed when various infections are activated. If the infectious process is long and difficult, then the chance of inflammation of the lymph nodes increases. In this case, you need to suppress the infection itself as soon as possible. If the nodes are constantly enlarged, this may be a symptom of other diseases. For example, if the lymph nodes are enlarged symmetrically and have a dense texture without any other symptoms, this indicates acute lymphocytic leukemia, a malignant blood disease. Also, enlarged and inflamed lymph nodes can be a sign of connective tissue diseases. But the assertion that this may be a sign of oncology is a myth. This condition is observed only in advanced stages. In any case, do not panic, you should go to the doctor and check everything carefully. Early diagnosis helps to avoid serious consequences of the disease. Technique 100 jumps But still the most common cause of enlargement and inflammation of the lymph nodes is improper circulation and stagnation of lymph in the body. Edema, excess weight - all these are also the sad consequences of a violation of this process. How to fix everything? This will be discussed. To make the lymphatic system work properly and the lymph circulate as it should, you will need lymphatic drainage techniques. One of the simplest and most effective is jumping in place. This exercise not only makes the lymphatic system work well, but also helps to eliminate swelling of the legs and face. What do we have to do? Everything here is simple to the point of banality. Stand on your toes, practically without taking your fingers off the floor, perform small bouncing. You don't have to jump high. Jumps should be fast and much lower than when you jump rope. When performing the exercise, women can support their chest with their arms bent at the elbows. Every morning you need to complete 100 jumps. If during the exercise you feel discomfort, stop at this number of jumps for a while and increase it gradually. The abdomen should be pulled in throughout the exercise. Make sure that there is no tension in the spine. This exercise will help disperse the lymph through the system and prevent its stagnation. Now do an exercise that helps relieve swelling of the legs. The same 100 jumps, only with heels hitting the threshold. You will need a threshold or other surface that rises 5 cm above the floor (book, balcony threshold). You stand on your toes and beat off 100 jumps with your heels. Make small and fast jumps, carefully and without strain. These exercises are recommended for everyone. Especially from the stagnation of lymph suffer people who lead a sedentary lifestyle, abuse alcohol and fatty foods. And also women, because the bra prevents the normal outflow of lymph. It is not recommended to do this exercise only for pregnant and lactating women. Agree, there is nothing complicated in this exercise. But thanks to him, you can ensure a healthy lymph flow and, as a result, get rid of excess weight and swelling. I think it sounds very attractive, it's worth a try!